Category: Technology and Innovation in Education (Page 2 of 2)

Strategies for Pickleball!

Welcome back to my free inquiry post! Today I am going to be talking about different strategies to use when you play pickleball! There are different strategies you want to use when you are either playing singles or doubles, so let’s start with the strategies you would want to use when you are playing doubles.

When playing doubles, you would want to stick with these strategies:

  1. Move as a team with your partner, staying parallel to each other.
  2. Communicate constantly with your partner about shot selection and court coverage.
  3. Dink strategically, especially down the middle between opponents. This can create confusion and expose weaknesses.

When playing singles, you would want to stick with these strategies:

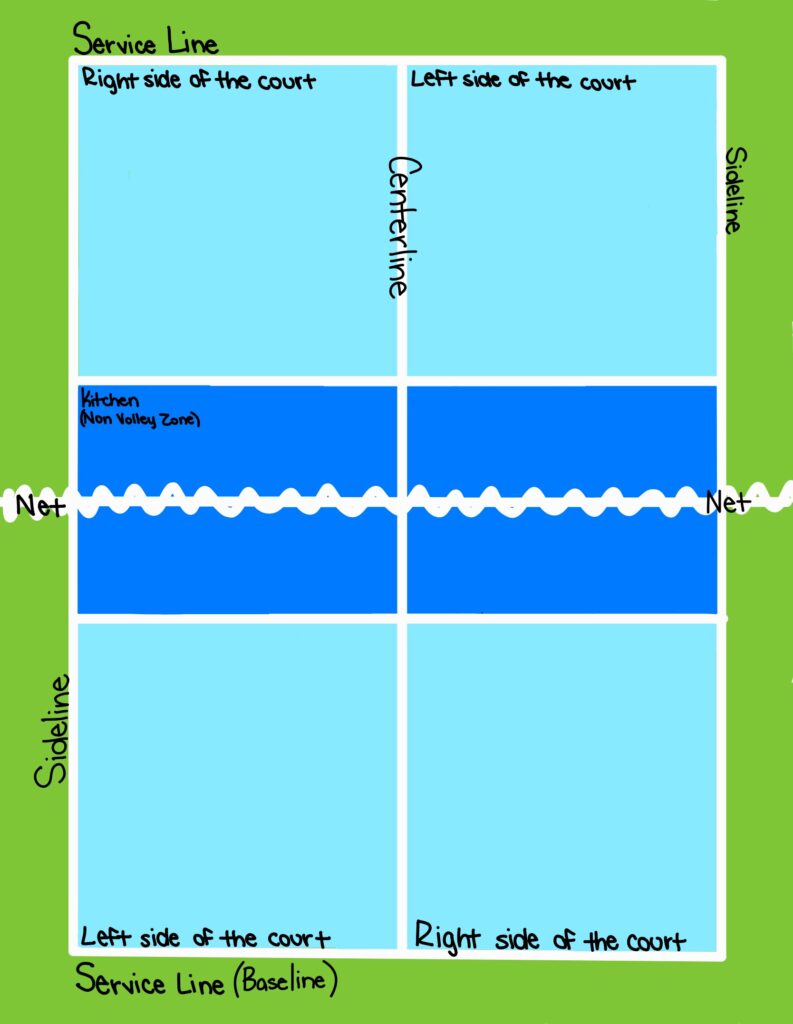
  1. Serve near the centreline so that you can get most returns easier.
  2. Generally you are wanting to stay on the back third of the court.
  3. Generally want to move the in the same direction that your opponent does but stay close to the centreline.
  4. If your opponent has managed to get to “kitchen” line or known as non-volley line, you have three options on what you can do:
    • lob the ball over your opponent
    • pass a hard passing shot over the net
    • a drop shot that will hit the ground close to your opponents feet

When you are playing doubles or singles you also want to keep these strategies in mind:

  1. Get to the non-volley zone (kitchen) line quickly after serving or returning serve. This puts you in the most advantageous position to attack.
  2. When caught in “no man’s land” (mid-court), stop and get ready rather than continuing to move forward.
  3. Serve deep into your opponent’s court with good pace. This pushes them back and makes their return more difficult.
  4. On the return of a serve, hit deep shots to the corners. This prevents your opponents from easily attacking.
  5. Aim serves and returns to your opponent’s backhand, which is often weaker.
  6. Use the “third shot drop” to neutralize your opponents’ advantage at the net. This soft shot lands in their kitchen, making it difficult to attack.
  7. Vary your shots to keep opponents guessing. Mix up power, spin, and placement.
  8. Aim for your opponent’s feet when possible. This forces them into awkward positions and can lead to errors.
  9. Play to your strengths and exploit your opponents’ weaknesses. Identify and target their weaker shots or less mobile player.
  10. Stay patient in rallies. Don’t force aggressive shots if they’re not available.
  11. Use both driving shots and soft drops as third shot tactics. Don’t rely solely on power hits.
  12. Add depth to your shots to keep opponents back from the kitchen line.
  13. Focus on placement rather than power in most situations.

By implementing these strategies and practicing them consistently, you can improve your pickleball game and become a more effective player on the court. For more information on pickleball strategies on singles and doubles click the links to watch some videos!

There are seven different shots that you can make while playing pickleball. I found this video that you should check out that explains the seven shots and a tip that goes with each of the shots that you can make while playing pickleball.

Stop Motion Video

For my reflection this week I will be talking about stop motion videos. Last week we created a stop motion video with three other people in our cohort. I created it with Carter White, Carolyn Mclean, and Barbra Skawski.

Materials we used:

  • Wooden penguins
  • Lego boat
  • Foam seat
  • A solid wall as our background
  • Phone to take the pictures

Take a look at our video that we created!

This week my class visited an elementary school in the area, where we collaborated with the students to create a stop motion video using the app Zing Studio.  

Material used:

  • Desk pets as the main characters
  • White board for our background
  • School iPads to capture each picture

It was an awesome experience working with the group of students. They were able to teach us both something new about the Zing Studio app which was that you could slow down the video you created if you wanted to make the video longer, which is something that both Carter White and I have not explored on the app yet. Check out the video that Carter White and I created with our group of students!

Throughout these experiences using stop motion videos in a class setting, I learned about the creative potential as well as time management constraints and technology familiarity. Collaborating with students provided me with new insights into how younger students can teach us something new and a lot of the time when it comes to technology, they will most likely know more than me.

Different type of stop motion videos:

  • Claymation
  • Cutout animation
  • Object motion
  • Puppet animation
  • Pixilation
  • Time-lapse

General equipment that you would need:

  • A camera (smartphone or tablet)
  • Tripod
  • Object that you will be moving (puppets, cutouts, wooden objects)
  • In a classroom, I would add random craft supplies so that the students can be creative for props and use their imagination
  • Any stop motion software
    1. Stop Motion Studio
    2. Dragonframe
    3. iStopMotion
    4. Zing Studio (which is what I used for both videos because it was already on the school iPads and it is free)

The timeline of creating a stop motion video can be very dependent on what you are doing for the video and how long you want the video to be. When I created the first video with my peers, we received less than an hour to do it and learn about the app. When we were collaborating with the students, we got an hour and a half to complete a filled out a story board about the events that were going to take place in our stop motion video and to film our stop motion video. That being said, in a classroom, a stop motion video could be planned in multiple days (story board one day, then film another). I would recommend doing it in two parts, story board then filming, or have a bit more time to complete the film because I found that we were rushing towards the end and we did not complete our storyboard.

Stop motion videos can be used many ways for educational purposes. If I were to include stop motion video into my future classroom, I could use it as a tool to engage students while allowing hands on learning and using their own creativity to learn about Science, Math, English, Art, and Social Studies. If I were to use stop motion videos in my own classroom, I would plan the story board for the day before I allow the students to film. I would also incorporate making stop motion videos in my classroom in multiple subjects like my list below!

  1. Science – Stop motion videos can be used to show and visualize scientific processes:
    • Plant growth (students could create a time-lapse animation showing seed germination, root development or leaf formation )
    • Animal evolution (students could use clay or drawings to show this)
  2. Social Studies – Stop motion videos can be used to show historical events or storytelling:
    • Recreating historical events using figurines or cutouts
    • Have an indigenous elder come and tell a story to the students and then they have to recreate it
  3. English – Stop motion videos could be used for storytelling and narrative skills
    • Students are in groups, get them to create a story and then they have to narrate (do a voice over of the video)
  4. Math – Stop motion videos could be used to visualize concepts and problem solving steps
    • Could get students to create a stop motion video to show their problem solving and their steps that they took to get their answer
    • Teachers could also create a stop motion video to demonstrate problem solving steps or videos about shapes

A couple more ideas that I have brainstormed were:

For Earth day, you could get students to create stop motion videos about Reduce, Reuse, Recycle. Or students could do research on how materials get recycled and they would have to show the steps of the recycled items lifecycle.

Lastly, for younger students could make a stop motion video on emotions and social interactions. You could split students up into multiple groups and have a couple groups doing emotions and what they mean, and the other group could create a video on conflict.

Creating stop motion videos with my cohort and with the students was such a great experience. With the students, you could tell that they were engaged and that it didn’t quite feel like school for them. The only thing I would change for stop motion videos in a classroom would be to allow for more time by planning the story board one day and then the next day the students would be able to create their props and film their movie. If I were to do this with a class, I would also bring out a whole bunch of materials that each group could pick from so that students have equal access to the materials (paper, whiteboards, markers, scissors, string, etc). Additionally, when working with the students they were in Grade 3, therefore if you were to do it with a younger group of students, they may need more assistance.

Pickleball Rules

Pickleball: The Basics

Pickleball is a rapidly growing sport that combines elements of badminton, ping-pong, and tennis. There are two popular stories about how the sport got its name: one story claims it’s named after “pickle boats” in rowing, which are made up of leftover rowers, while the other story attributes the name to a dog named Pickles who would chase after the ball during games.

Whether you’re new to the game or just need a refresher, understanding the basic rules of pickleball will help you enjoy the game and play smoothly.

Starting the Game

To begin, players decide who serves first by doing a coin flip or playing rock-paper-scissors. The winner gets to choose either the side of the court they want to play on or if they want to serve or receive. If you’re playing doubles, each player is responsible for covering their rectangle on the court.

Serving

The player on the right-hand side of the court always serves first. The server announces the score before each serve, and during the first round of serves, the starting team only gets one serve to ensure fairness. The score is called out in three parts: your team’s score, the opposing team’s score, and your serving number (either 1 or 2). For example, the first serve of the match will be “0-0-2.”

Here are the key rules for serving:

  • The serve must be underhand, with the paddle contacting the ball below the waist.
  • The server must stand behind the service line.
  • The ball must be served diagonally and land in the opposite service area.
  • If the ball hits the kitchen line or lands in the kitchen on a serve, it’s a fault.
  • If the ball hits the net and lands in the correct service area, it is considered a “let” and the serve is replayed.

The Two-Bounce Rule

After the serve, the ball must bounce once on each side of the court before players can begin volleying (hitting the ball before it bounces). This is known as the two-bounce rule.

The Kitchen (Non-Volley Zone)

The kitchen, or non-volley zone (NVZ), is a 7-foot area on both sides of the net. Players cannot step into or touch the kitchen line while making a volley (a shot hit before the ball bounces). If a player’s paddle or any part of their body enters the kitchen while volleying, it’s considered a fault.

However, after the ball has bounced, players may step into the kitchen to make a shot. They can also enter the kitchen to retrieve a ball that has landed there, but only after the ball has bounced.

Scoring

Pickleball is typically played to 11 points, and a team must win by 2 points. In tournaments, games may go to 15 or 21 points. A team can only score points while serving, and the game continues until one team wins by a 2-point margin.

Faults

Faults in pickleball occur when:

  • The ball lands out of bounds.
  • The serve does not land in the correct service box.
  • A player volleys the ball from within or on the kitchen line.
  • The ball is hit into the net or hits the net post.
  • A player touches the net or the ball touches a player.
  • The ball bounces twice before being returned.

Line Calls

Players are responsible for making their line calls. If a player cannot decide whether the ball is in or out, it should go to their opponents. Players should avoid calling the lines on the opponent’s side.

Wrapping Up

By following these rules, you can enjoy the game of pickleball to its fullest. It’s a fast-paced, strategic game with simple rules that make it easy to pick up but challenging to master. Remember, sportsmanship is key, so always respect your opponents and have fun!

I created this diagram using my iPad with the lines of the court to make it easier to follow!

For more information on the pickleball rules or pickleball in general I highly suggest taking a look at the Canada pickleball website! Or if you are a visual learner, I recommend watching this short video on the basic rules!

Screencasting and Epic! Books

For this week’s class, we learned how to make a screen cast using the app Screencastify. I have never used anything like Screencastify or Epic! Books, so I did not know what to expect. With the instructions of Allie Kostiuk, I was able to do a recording of the app Epic! Books which I then show you how the app/website works. Epic! Books can be accessed through their app or through their website, and it is a platform that provides teachers/educators and students with access to a variety of eBooks, audiobooks, educational videos, and educational quizzes on the books. For more information, check out my video that I created using Screencastify. After I created the video, I used iMovie on my laptop to edit the video.

Screencastify can be used in the classroom by recording lectures, step-by-step tutorials, and lastly student presentations to present their topic if they are feeling uncomfortable or anxious to present in a class setting. Epic! Books can be used in the classroom by allowing independent reading, reading comprehension practice, and allowing students to have different book variety in the classroom. Additionally, on Epic! Books, educators can view what books students are reading and how long the students have been reading for. Epic! Books is a great resource for reading and literacy.

There are many benefits for both Epic! Books and Screencastify. They both allow teachers to reach out to students who may not be able to attend class or for those students who may want or need to hear the lesson again if they don’t grasp the concept. Which then allows students to access these read alongs or Screencasting‘s of different subjects anytime that they want. There is also some limitations and that would have to do with copyright and student limitations to technology. As a class, we talked about copyright, something you would have to look into is if Epic! Books allows recordings of their books. My experience of gaining knowledge for both Sceencastify and Epic! Books has been very valuable for enhancing my digital teaching toolkit and something that I will definitely be implementing in my future classroom. Epic! Books and Screencastify contribute to my academic, professional and personal development by enhancing my own understanding of educational technology and exploring new teaching methods, keeping students engaged, shows flexibility in lessons, shows my creativeness for editing the Screencastify videos and overall it would improve my communication skills.

Check out my tutorial on Epic! Books.

Introduction to My Blog Post

Hello!
Welcome to my blog. I’m currently in my second year of the East Kootenay Education Program through the University of Victoria. This blog is part of a free inquiry project designed to help me become more comfortable with using technology, and, as part of the assignment, I’m exploring how to create a blog post for the first time—so bear with me as I figure things out!

For this project, I’ve chosen to focus on pickleball. Sports have always been a big part of my life, from house league soccer and school teams to playing on club teams, and I just finished playing on a collegiate volleyball team. Recently, I started playing pickleball and found it to be a fun, accessible sport for all people to enjoy.

Through this blog, I want to explore how I can incorporate pickleball into the classroom, as well as deepen my understanding of the rules and strategies involved. Some topics I plan to cover include:

  • The rules of pickleball and court layout
  • Different strategies for playing pickleball
  • Why pickleball is growing in popularity
  • The role of technology in pickleball
  • How to incorporate pickleball in the classroom and the benefits

My Digital Footprint

After watching the TED Talk “Reevaluate, Rethink, Release” by Jesse Miller, I’ve begun to think more critically about my digital footprint. Jesse talked about the importance of reevaluating our digital habits and being mindful of what we share through the technology we use. I’ve always been aware that anything I post or share will leave a digital trace, but this talk made me understand how easy it is to find personal information.

When I searched my name, “Lauren Penney,” I found that many other people with the same name appeared before me, but it didn’t take long to locate myself. The first result I found was from 2022, a post by the Cranbrook Townsman about my signing for the College of the Rockies Women’s Volleyball team. The first two links were from the college website, documenting the two years I played there. The third link was my Hudl account, which features videos of me playing volleyball.

I was curious about how much more I could find, so I decided to search “Lauren Penney Cranbrook BC.” This search revealed even more—everything from my social media accounts to articles about volleyball opportunities I received, including a mention of my club volleyball team back in 2019. Although I still found information about other people named Lauren Penney, most of the pictures and links were about me.

I was surprised by how much information was available about me, and I didn’t expect it to be so easy to access. I thought there might be one or two things, but I found more. While my social media accounts are private, and only my usernames and profile pictures are visible, I wasn’t expecting to find much. Most publicly available links were related to volleyball, which I had expected since I had signed consent forms.

This experience made me realize how much and what we post online shapes how others see us—and that perception can be either positive or negative. Even though we might delete something, it can still exist somewhere online. Searching for my name has shown me how easy it is to find information about people.

As I move forward, especially as I prepare to enter the teaching profession, I’ll be more conscious about my digital footprint and will always ask myself how I want the parents of my future students to view me online.

My Experience with Social Media

For my first reflection, I’ll be discussing my experience with social media. I started using social media when I was in Grade 4, which, looking back, was quite young to be accessing the internet. At that time, I was so excited to have Instagram because everyone my age had it. However, I realize now that I didn’t know the safety precautions that are crucial for protecting personal information online.

I’ve grown up alongside the development of TVs, computers, and smartphones, so I feel very comfortable using social media. For the most part, I use it to stay updated on what my friends and family are up to. The platforms I’ve used for personal purposes include Instagram, Pinterest, Facebook, TikTok, VSCO, and YouTube.

Out of all of them, Pinterest is my favourite because it allows me to organize and create ideas, whether for educational purposes or day-to-day life. In our recent classes, we’ve discussed which platform we would most likely use professionally, and for me, it would definitely be Pinterest. I love how I can take ideas from others, adapt them for my future classroom, and modify them to meet the needs of my students. Throughout my schooling and practicums, I plan to gradually build a Pinterest board filled with ideas for student engagement and educational content.

I’ve had a lot of personal experiences with social media, so I understand why so many people are drawn to it. It connects us with friends and family, provides a form of communication, and can even be used for educational purposes. In my case, social media has also helped me confirm that teaching is the right profession for me, as I’ve gained inspiration from teacher content creators on TikTok and Instagram. That said, I recognize that many people, including creators, often post to show the world how they want to be perceived.

While I’ve had positive experiences with social media, I’ve also faced some challenges, particularly with time management. Social media is so easily accessible that I often find myself procrastinating, spending 20 minutes on my phone when a task might only take five minutes to complete. To address this, I’ve set time limits on each app to help minimize my screen time.

Newer posts »